

Nighttime shoulder recovery guide
Shoulder Immobilizer Sleeping Mistakes:
9 Errors That Can Worsen Your Night
The room is dark, the pillows have migrated, and your shoulder immobilizer suddenly feels less like protection and more like camping equipment attached to your torso. Nighttime recovery is difficult because the shoulder must remain protected while the rest of you still needs to turn, stand, reach, use the bathroom, and sleep.
The most common problems are rarely dramatic. An elbow slowly slips backward. A strap tightens as swelling changes. A soft mattress rotates the torso. A phone placed on the wrong side prompts one sleepy reach. Small setup errors can quietly undo an otherwise careful evening.
This guide helps you identify those errors, compare a bed with a recliner, support the whole arm without redesigning the brace, and recognize when discomfort has crossed the line into a symptom that deserves medical attention.
Protect the position
Prevent the elbow, forearm, and torso from drifting overnight.
Reduce sleepy reaches
Place essential items where the uninjured hand can find them.
Know when to call
Separate ordinary inconvenience from circulation, nerve, wound, or pain warnings.
A safer night begins before you become tired: build, test, and photograph the setup while you are fully awake. 🌙
Snapshot
This article is for patients and caregivers managing a prescribed shoulder sling or immobilizer at night. It explains why common sleep setups fail, how to compare support options without changing the prescribed brace position, and how to prepare a safer bed, recliner, and nighttime route. By the end, you will have a 15-minute setup check to complete before bedtime.
Table of Contents
Before You Adjust Anything: Your Instructions Outrank Internet Comfort Hacks
A shoulder immobilizer is not merely a fabric pouch. Depending on your injury or operation, it may be controlling rotation, limiting movement, supporting repaired tissue, or holding the arm in a specific relationship to the torso.
That is why the correct nighttime position after a rotator cuff repair may differ from the position used after shoulder replacement, fracture treatment, labral surgery, instability surgery, or a nonsurgical injury. Even two people wearing similar-looking devices may have different removal schedules and movement restrictions.
What this guide can and cannot do
This article can help you spot common setup problems, organize practical questions, and reduce preventable nighttime reaching, rolling, and slipping. It cannot tell you whether your particular repair is secure, whether a strap may be rerouted, or whether you may remove an abduction pillow.
Your surgeon’s written instructions, discharge paperwork, physical therapist, and brace-fitting demonstration take priority. When those sources seem inconsistent, contact the treating team rather than choosing the instruction that sounds most comfortable.
Before You Act
Do not discontinue the immobilizer, remove an abduction component, change strap routing, begin a new exercise, or sleep in a newly permitted position based only on general online information. Confirm procedure-specific decisions with the clinician responsible for your recovery.
Build a permission list before building a pillow fort
Many nighttime arguments with a brace begin because nobody knows which adjustments were actually approved. Turn vague memories into a one-page permission list.
- Must the immobilizer stay on while sleeping?
- May it be removed for hygiene, dressing, or exercises?
- Is back sleeping required, or is the non-injured side permitted?
- Should the arm remain against the body or supported away from it?
- Which straps may be adjusted for fit?
- What should you do if the elbow slips out of the pocket?
- Whom should you call after hours if the device no longer fits?
If you are unsure whether you have a simple sling, an immobilizer, or an abduction device, review this shoulder immobilizer versus sling guide before comparing sleep accessories. Buying more pillows will not solve confusion about what the device is supposed to do.
Key takeaway
Treat your written recovery instructions as the operating manual. Pillows and furniture should support that plan, not quietly replace it.
Mistake #1: Sleeping Flat Before Your Shoulder Tolerates It
Returning to a normal bed position can feel like a milestone. Unfortunately, lying flat may allow the upper arm to drift backward, increase pressure around the shoulder, or make getting up much harder.
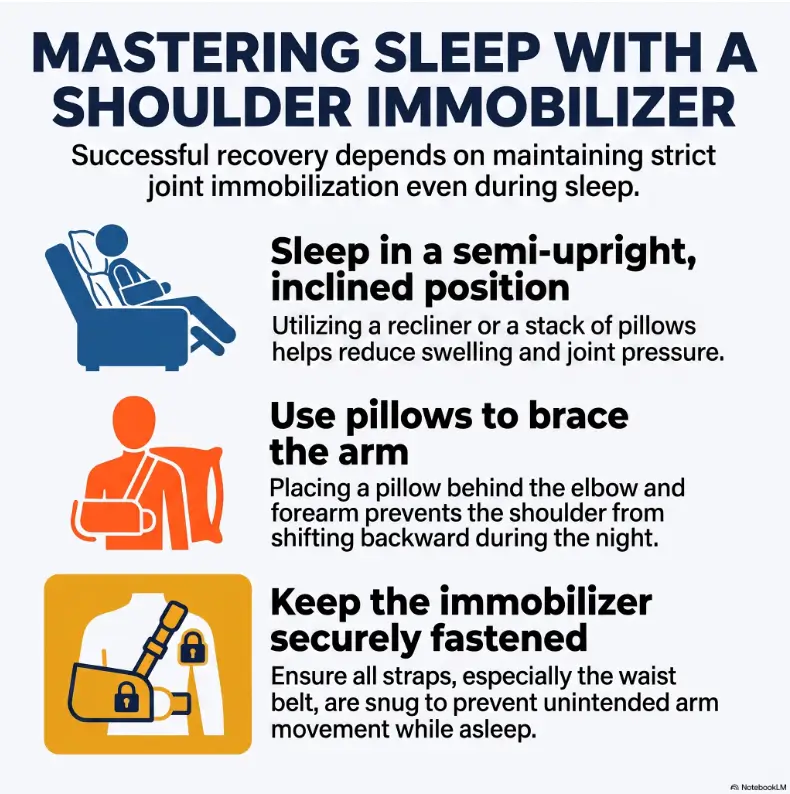
Several orthopedic programs advise patients to consider a recliner or a reclined bed during early recovery because many people experience more pain when flat. Mass General Brigham also advises sleeping propped up and wearing the prescribed sling after rotator cuff surgery. The correct duration remains procedure-specific.
Elevate the torso, not only the neck
A pile of soft pillows beneath the head can bend the neck while leaving the chest nearly flat. The result is a sore neck, a sliding body, and a shoulder that still lacks useful support.
A more stable setup supports the upper back and torso as one unit. A firm wedge, an adjustable bed, or a stable recliner may make this easier, but none is automatically correct for every patient. Review the tradeoffs in this guide to sleeping in a recliner versus a bed after shoulder surgery.
Watch for the slow slide
Elevation fails when your hips drift downward during the night. As the torso slides, the immobilizer may pull against the neck, the elbow may move behind the body, and the chin may drop toward the chest.
- Sit in the setup for 10 minutes before bedtime.
- Check whether your hips begin sliding toward the foot of the bed.
- Confirm that the neck remains neutral rather than sharply bent.
- Make sure the immobilizer does not become the anchor holding your body in place.
When a wedge may help, and when it may waste money
A wedge may be useful when it supports the full upper torso, stays stable on the mattress, and allows a safe transfer. It may be poor value when it is too steep, too narrow, unusually soft, or incompatible with your mattress.
Before purchasing one, measure the usable bed width and consider how you will sit down and stand up with only the uninjured arm available. This post-surgery wedge pillow checklist explains the practical features worth comparing.
| Setup tier | What it uses | Best fit | Main caution |
|---|---|---|---|
| Good | Existing firm pillows arranged behind the torso | Short-term use when the arrangement stays stable | Loose pillows may separate or collapse |
| Better | Stable wedge or supportive recliner plus elbow support | Patients who need repeatable elevation | Test transfers before relying on it overnight |
| Best for a complex fit | Clinician-approved setup with brace fit review and caregiver rehearsal | Abduction devices, recurring slippage, limited mobility, or high fall risk | Higher effort and possible equipment cost, but less guesswork |

Mistake #2: Leaving the Elbow Unsupported
The elbow is the quiet hinge of the entire nighttime setup. When it drops backward, the upper arm may follow. When it slides out of the sling pocket, the wrist may end up carrying more of the arm’s weight.
University of Iowa Health Care advises some shoulder-replacement patients to sleep reclined, wear the sling, and place a pillow behind the elbow. Washington University Orthopedics gives similar guidance after rotator cuff surgery. These are useful principles, but the pillow should not force the arm away from the position prescribed for you.
Support three points, not one
A stable arm often needs support at more than the shoulder. Think of the limb as a small bridge with three places that may sag.
- Elbow: Prevent it from falling behind the torso or slipping out of the sling pocket.
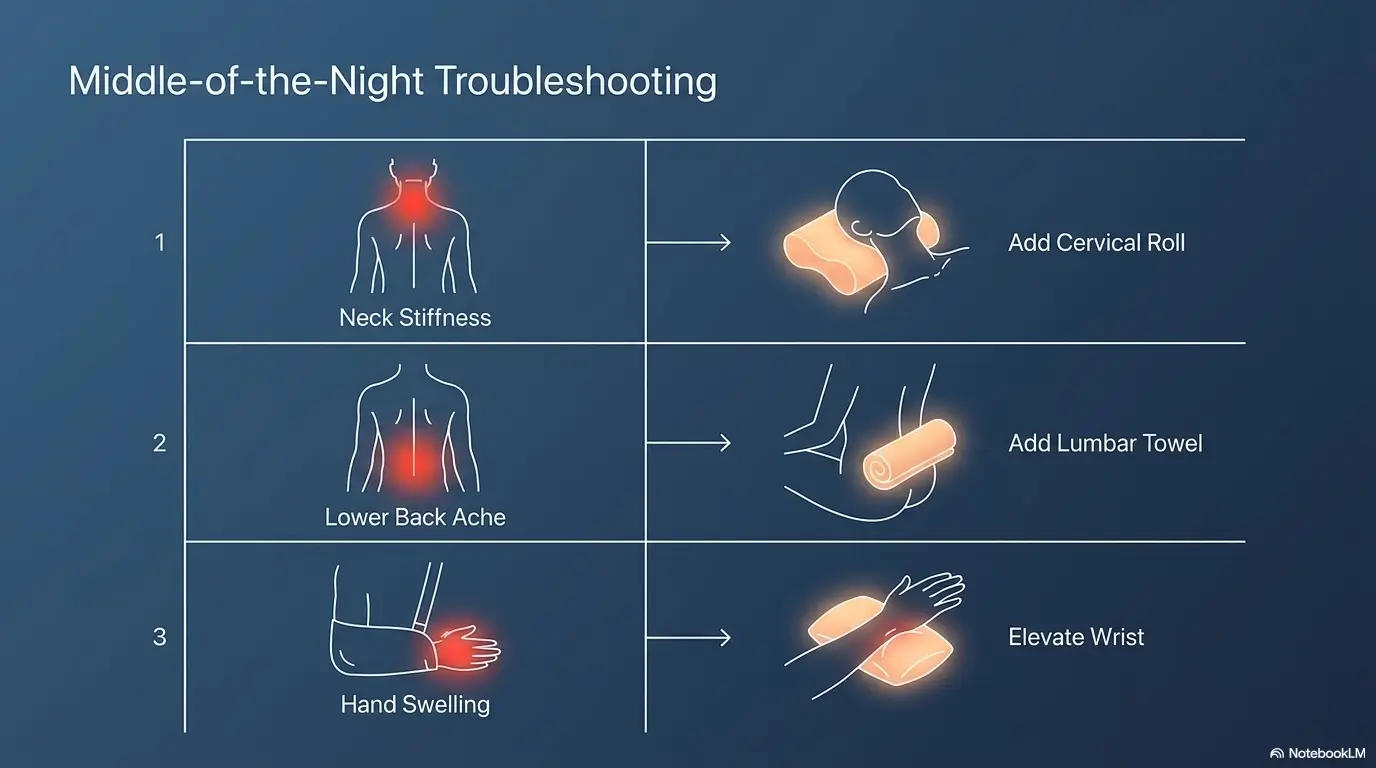
- Forearm: Keep the forearm supported so the wrist does not hang downward.
- Outer arm: Use a barrier to discourage the torso from rolling toward the injured side.
Short Story: The pillow that was doing the wrong job
Daniel’s daughter built what looked like an excellent recovery nest: four pillows behind his back, two beneath his knees, and one large pillow under the injured arm. The arrangement appeared luxurious in the daylight.
By midnight, the large arm pillow had pushed the immobilizer upward. The neck strap pressed against his skin, his elbow crept out of the pocket, and his fingers began to tingle. They kept adding softer pillows, assuming comfort required more cushioning.
The next morning, they photographed the setup and compared it with the clinic’s fitting demonstration. The problem was not a shortage of padding. The elbow needed a smaller, firmer support behind it, while the abduction component needed to remain undisturbed.
The practical lesson was pleasantly unglamorous: every pillow needs one clearly defined job. If nobody can explain what a pillow is preventing, it may be changing the brace rather than supporting it.
Key takeaway
Support the elbow and forearm without pushing, twisting, or widening the brace position. A smaller firm support often works better than a giant soft pillow.
Show me the nerdy details
The arm and immobilizer create a linked system. When gravity moves the elbow backward, the upper arm can rotate or extend with it. A sling may also transfer part of the arm’s weight to the neck strap, which is why an unsupported elbow can create discomfort far from the shoulder.
The goal of external pillow support is not to create a new therapeutic position. It is to reduce unwanted movement around the position already created by the immobilizer. That distinction matters most with fracture braces and abduction-pillow devices.
Mistake #3: Removing or Refitting the Immobilizer at Night
“I am not going anywhere” sounds reasonable at bedtime. The sleeping body disagrees. People roll, brace themselves, reach for blankets, and react to pain before they are fully awake.
When nighttime immobilizer use has been prescribed, removing it can eliminate protection during exactly those unconscious movements. Mass General Brigham advises patients recovering from rotator cuff surgery to wear the sling at bedtime until their care team permits otherwise.
Do not loosen everything until the brace disappears
A correctly fitted immobilizer should not feel like a tourniquet, but loosening every strap until the arm moves freely may defeat its purpose. Make only the minor fit adjustments that your clinic demonstrated or approved.
If a strap repeatedly digs into the neck or the device slips every night, document the problem. A clear photograph is more useful to the clinic than saying, “It feels weird.” Include the front, side, elbow pocket, wrist position, and any pressure mark.
Keep the elbow where the device was designed to hold it
A sling supporting only the wrist may leave the elbow poorly controlled. Before sleep, check that the elbow is seated as demonstrated and that the forearm is not hanging below the fabric.
Do not force the elbow into place with active shoulder movement. If restoring the demonstrated position requires lifting or rotating the operated arm, ask a caregiver for approved assistance or contact the treating team.
Keep bedding out of the brace mechanics
Heavy comforters and tightly tucked sheets can pull on the forearm, compress the hand, or wedge between the arm and an abduction pillow. Use lighter bedding when practical and drape it so the free hand can move it without reaching across the body.
01 · PROTECT
Keep the prescribed brace position unchanged.
02 · SUPPORT
Stabilize the elbow, forearm, and torso.
03 · REACH
Move nighttime essentials to the uninjured side.
04 · CHECK
Inspect the hand, straps, skin, and wound symptoms.
Mistake #4: Trusting Side Sleeping Without a Barrier Plan
The non-injured side may eventually be an approved option for some patients, but “good side” does not mean “automatically safe.” Your procedure may require back sleeping, semi-reclined sleeping, or a longer period before side sleeping is permitted.
AO Foundation fracture-care guidance describes sleeping on the back or non-injured side while wearing the sling, with the injured arm supported. That guidance applies to a particular fracture-recovery context and should not be treated as universal permission after every shoulder operation.
Build the front support first
When side sleeping has been approved, the immobilized arm may need support across the front of the torso. The support should prevent the shoulder from dropping forward without forcing the arm into a new angle.
- Place support where the forearm can rest without pulling on the neck strap.
- Keep the elbow from dropping toward the mattress.
- Check that the hand remains visible and easy to inspect.
- Avoid burying the immobilizer beneath heavy bedding.
Use a back barrier to discourage rolling
A firm pillow behind the back can create a gentle stop before your body rolls onto the affected side. It should discourage movement, not trap you so firmly that getting up becomes difficult.
Test the barrier by pretending to wake for the bathroom. If you cannot sit up without twisting, pushing through the injured arm, or becoming tangled in pillows, simplify the arrangement.
Do not “test” the operated side because it hurts less tonight
Pain is not a reliable permission slip. Reduced discomfort may reflect medication, a nerve block, fatigue, or a good day rather than completed healing.
Mass General Brigham advises avoiding the affected side for at least six weeks after rotator cuff surgery, while other procedures may have different timelines. Follow the date or milestone supplied by your own clinician.
Mistake #5: Ignoring Straps, Hand Symptoms, and Skin Pressure
A protected shoulder should not require sacrificing the hand, skin, or nerves. New tingling, worsening numbness, marked swelling, color change, coldness, reduced finger movement, or severe pressure deserves attention.
Some patients temporarily experience numbness after a regional nerve block. The problem is assuming every later sensation must be the block. When symptoms are new, worsening, one-sided, or persistent beyond the instructions you were given, contact the care team.
The 60-second hand check
Without changing the prescribed brace position, compare the injured-side hand with the other hand before turning off the light.
- Are the fingers unusually pale, blue, or markedly red?
- Is swelling significantly worse than earlier?
- Does the hand feel unusually cold?
- Is tingling or numbness new or increasing?
- Can you move the fingers as instructed?
- Is a strap edge pressing sharply into the wrist or forearm?
Protect the neck and skin without rerouting straps
Neck discomfort can come from poor strap placement, unsupported arm weight, rough fabric, or a slowly sliding torso. Approved soft padding around a pressure point may help, but adding bulky material beneath straps can alter fit.
Inspect the neck, wrist, forearm, elbow, and torso each day. Persistent redness, broken skin, blisters, or deep pressure marks should be photographed and reported.
Do not perform a major refit at 2 a.m.
Sleepiness, pain, and medication are poor companions for complicated strap routing. If the brace cannot maintain the demonstrated position, use your after-hours instructions or call the clinic when it opens rather than inventing a new configuration.
Key takeaway
Comfort problems can sometimes wait for a daytime fit check. New circulation, nerve, movement, swelling, or skin problems should not be dismissed as ordinary sling annoyance.
Mistake #6: Choosing a Recliner or Bed by Comfort Alone
The softest surface is not necessarily the safest one. A useful sleeping setup must support the prescribed position and allow you to enter, remain in, and leave without pushing, pulling, or twisting through the injured arm.
The recliner advantage, and its hidden cost
A recliner can limit rolling and create repeatable elevation. It may also be easier to surround with a small number of firm supports.
The hidden problem appears during transfers. A deep chair may require a strong push from both arms. A manual handle may sit on the injured side. A powered model may become unusable during an outage or if the remote falls to the floor.
The bed advantage, and the mattress sinkhole problem
A bed gives caregivers more room to arrange support and may be familiar for transfers. However, a soft mattress can let the torso rotate while the immobilizer remains relatively fixed.
Loose pillows may also scatter during the night. If the setup requires rebuilding every time you use the bathroom, it is too complicated.
| Decision factor | Recliner | Bed |
|---|---|---|
| Elevation | Often easier to repeat | May require a wedge or structured pillows |
| Rolling control | Usually limits side-to-side movement | May need side barriers |
| Transfer | Can be difficult if deep or low | Depends on mattress height and edge firmness |
| Elbow support | May need a small firm pillow | More placement options, but pillows may shift |
| Cost | Potentially higher if equipment must be rented or purchased | Often uses existing furniture plus low-cost supports |
| Best choice | The surface you can use without loading the injured arm or losing the prescribed brace position | |
Run the exit test before the sleep test
- Sit or lie down using only the approved transfer method.
- Confirm that the elbow remains supported and the brace does not shift.
- Reach the light, phone, and water with the uninjured hand.
- Stand without pushing through the immobilized side.
- Walk to the bathroom and return once while fully awake.
A caregiver should observe the rehearsal from the side. The person performing the transfer may not notice the shoulder drifting backward or the elbow leaving the pocket.
Mistake #7: Leaving Midnight Logistics to Your Half-Asleep Self
A beautifully supported shoulder can still be undone by one sleepy reach for a phone. Nighttime logistics are not housekeeping trivia. They are part of the protection plan.
Build an uninjured-side control station
Place frequently used items within easy reach of the free hand. Keep the surface uncluttered so you do not have to dig beneath blankets or lean across the body.
- Phone and charger
- Water in an easy-to-open container
- Glasses and tissues
- Medication log and approved doses
- Call bell or caregiver alert
- Light control
- Small waste container
For a practical one-handed arrangement, use this guide to placing remote controls after shoulder surgery. The principle applies to phones, lamps, adjustable furniture controls, and call devices.
Clear the bathroom route before medication makes it foggy
Remove loose rugs, electrical cords, pet toys, low stools, and unstable furniture. Add a night-light that illuminates the floor without requiring you to cross the room in darkness.
The immobilizer makes your body wider and can block your view of objects near the injured side. Practice doorways and turns while awake. The same principles used in a safer nighttime bathroom path after surgery can help shoulder patients reduce hurried turns and unexpected obstacles.
Plan for pets, children, and wandering blankets
A pet jumping onto the injured side or a child seeking comfort at night can trigger a fast protective movement. Create a temporary boundary and explain that the shoulder needs space.
Keep blankets light enough to move with the uninjured hand. Avoid tightly tucked bedding that requires a two-handed pull or traps the immobilizer against the torso.
Mistake #8: Turning Cold Therapy and Medication Into Sleep Shortcuts
Pain control supports sleep, but more is not automatically better. Medication and cold therapy should follow the written plan rather than becoming improvised ways to force an uninterrupted night.
Do not sleep on an unattended ice source
Ice packs and cold-therapy devices can shift, leak, compress the brace, or injure skin that is numb from medication or a nerve block. Follow the prescribed duration, skin barrier, and equipment instructions.
Unless your clinical instructions specifically permit overnight use, remove the cold source before you fall asleep. Set an alarm during an approved treatment session rather than relying on yourself to wake naturally.
Do not stack sedating products
Do not take extra prescription medication merely to make yourself sleep. Avoid combining pain medicine with alcohol, sleep aids, antihistamines, cannabis products, or other sedating substances unless a clinician or pharmacist has confirmed the combination is appropriate.
Use a written log when more than one person is helping. Medication confusion becomes more likely during the night, especially when a patient is tired or groggy.
Ask better medication questions
- Which medicine is scheduled, and which is only as needed?
- What is the minimum interval between doses?
- Which side effects require a call?
- May this medicine be taken with an over-the-counter sleep aid?
- What should happen if pain wakes me before the next permitted dose?
- Could a regional nerve block explain current numbness, and when should it improve?
For persistent nighttime symptoms, record what the pain feels like, where it travels, what time it appears, and whether repositioning changes it. This guide to explaining night pain to a doctor can help turn a blurry complaint into useful clinical information.
Mistake #9: Waiting Through Symptoms That Need Attention
A bad night is not automatically an emergency. Yet certain symptoms deserve more than another pillow adjustment.
Cleveland Clinic advises contacting a healthcare provider after shoulder arthroscopy for concerns including fever, abnormal wound discharge, numbness or tingling, severe bleeding or swelling, and pain that does not improve with medication. Your discharge instructions may contain additional procedure-specific warnings.
Contact the treating team promptly for these problems
- New or worsening numbness or tingling
- A hand that becomes pale, blue, unusually cold, or difficult to move
- Marked or rapidly increasing swelling
- Bleeding or unusual wound drainage
- Fever or redness spreading away from an incision
- Pain that remains uncontrolled despite taking medication as prescribed
- Skin breakdown caused by the device
- An immobilizer that repeatedly slips or cannot hold the prescribed position
Seek urgent or emergency care when the situation is severe
Use emergency services or urgent medical evaluation for breathing difficulty, chest pain, fainting, severe weakness, uncontrolled bleeding, sudden loss of movement or sensation, or a new deformity after a fall or forceful movement.
Do not drive yourself while wearing a sling, while impaired by medication, or when you cannot safely control the vehicle. Follow the transportation instructions from your care team.
| What you notice | Reasonable next step |
|---|---|
| Mild pressure that resolves after an approved minor adjustment | Document it and request a fit check if it returns |
| Repeated slippage without new nerve or circulation symptoms | Photograph the fit and contact the clinic |
| New tingling, color change, coldness, or reduced finger movement | Contact the treating team promptly |
| Uncontrolled bleeding, breathing difficulty, fainting, sudden paralysis, or deformity after a fall | Seek urgent or emergency care |
Key takeaway
Do not spend the night repeatedly rebuilding pillows around a hand that is becoming numb, cold, discolored, severely swollen, or difficult to move. The symptom, not the pillow arrangement, has become the priority.
Shoulder Immobilizer Sleeping FAQ
Should I sleep with my shoulder immobilizer on?
Wear it at night when your surgeon or treating clinician has instructed you to do so. Nighttime requirements vary by operation, injury, brace type, and stage of recovery. A recliner or pillow arrangement does not replace prescribed immobilization.
Can I remove the sling while sleeping in a recliner?
Not unless your care team has approved removal during sleep. A recliner may reduce rolling, but it does not prevent every unconscious reach, shift, or protective reaction.
How should I support my elbow while sleeping?
Use the arrangement demonstrated by your care team. Many postoperative instructions recommend a pillow behind or beneath the elbow so the arm does not fall backward. The support should not force the shoulder away from the position created by the brace.
Can I sleep on my non-surgical side?
Some patients are permitted to sleep on the non-injured side with the immobilized arm supported across the chest. Others must remain on their back or reclined. Confirm the restriction for your specific procedure before trying it.
Why does my hand go numb in the immobilizer?
Possible explanations include a recent nerve block, swelling, strap pressure, arm position, or nerve irritation. New, worsening, or persistent numbness should be reported rather than assumed to be harmless.
How tight should the shoulder immobilizer straps be?
The straps should maintain the prescribed arm position without causing worsening numbness, coldness, color change, severe pressure, or skin injury. Ask the clinic to demonstrate the correct fit and identify which straps you may adjust.
How long should I sleep upright after shoulder surgery?
There is no universal timeline. Some patients use elevation mainly during the earliest painful period, while others require a longer period based on the operation, injury, and surgeon’s protocol. Ask what milestone should guide your transition rather than choosing an arbitrary date.
What should I do if the sling slips overnight?
Avoid forceful shoulder movement. Return the device only to the position you were taught to use. Photograph repeated slippage and request a fit review, especially if the elbow will not remain seated or the hand develops symptoms.
Build Tonight’s Setup in 15 Minutes
You do not need to create a hotel suite for one shoulder. You need a repeatable arrangement that protects the prescribed position, supports the arm, reduces unnecessary reaching, and lets you leave the sleeping area safely.
Minutes 1 through 5: Position
- Choose the approved bed or recliner position.
- Support the upper torso without sharply bending the neck.
- Add the smallest effective elbow or forearm support.
- Confirm that no pillow is altering an abduction component.
Minutes 6 through 10: Reach
- Move the phone, water, light control, and medication log to the uninjured side.
- Clear the route to the bathroom.
- Place stable footwear where you can reach it safely.
- Move pets, cords, rugs, and low furniture out of the path.
Minutes 11 through 15: Rehearse
- Get into the sleeping position without loading the injured arm.
- Perform the hand and strap check.
- Stand, walk to the bathroom, and return once.
- Photograph the final brace position from the front and side.
Compare the photograph with the clinic’s fitting instructions. Keep it as a reference for the next night. If the elbow, wrist, or abduction component repeatedly moves despite the same setup, send the image to the treating team or take it to your next appointment.
Tonight’s one concrete next step
Take one front photograph and one side photograph of your completed setup while you are fully awake. Those two images can reveal a slipping elbow, hanging wrist, collapsing torso support, or altered brace position more clearly than memory can at midnight.
A good recovery setup is rarely impressive to look at. It is quiet, stable, easy to repeat, and almost boring. That is its charm. Your tired nighttime self should not have to solve a new engineering problem every time the lights go out.
Last reviewed: 2026-08