

Recovery Home Setup · Knee replacement · Night safety
Night Bathroom Path Setup After Knee Replacement
A Safer 10-Minute Plan
The most dangerous walk after knee replacement is not always the longest one. Sometimes it is the sleepy little voyage from bed to bathroom, taken at 3 a.m. with a stiff knee, dim light, pain medicine in the background, and a walker waiting one awkward reach away.
A safer night bathroom path is not about turning your home into a hospital room. It is about removing small frictions before they become large problems: the rug edge, the half-closed door, the phone across the room, the bathmat waiting in the walker’s turning zone like a tiny villain in cotton.
This guide gives patients and caregivers a practical, low-drama setup for the first recovery weeks after knee replacement. You will build the route from bed to toilet, test it at night, choose simple safety tools wisely, and know when a near-fall or new symptom deserves a call to the care team.
Clear the route
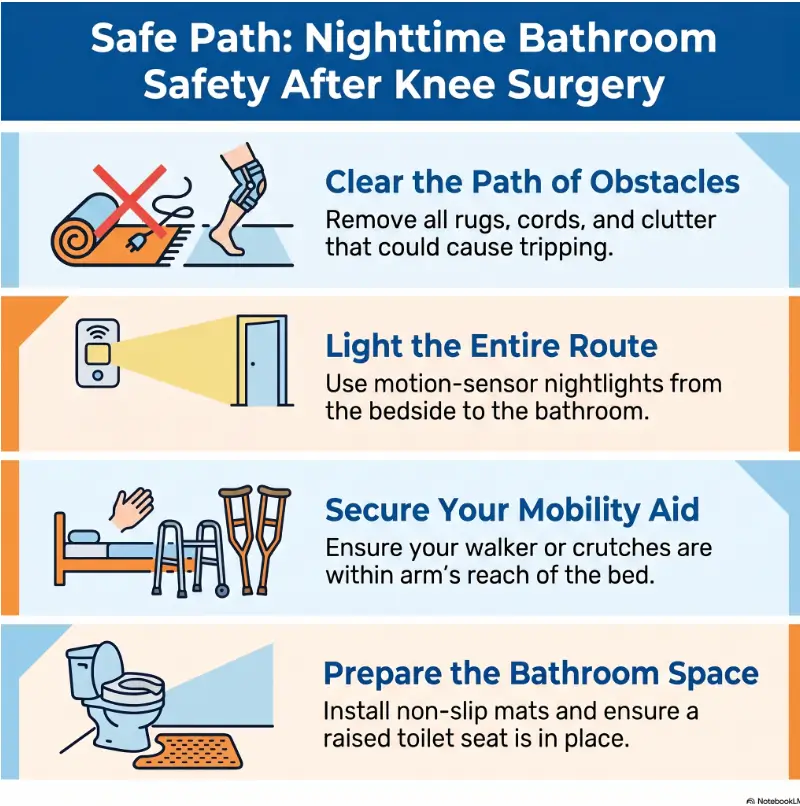
Remove rugs, cords, laundry, pet toys, and furniture pinch points before bedtime.
Light the path
Use low-glare nightlights so the path is visible without a harsh visual jolt.
Protect transfers
Set up the toilet area so sitting, standing, and turning need fewer risky moves.
Small setup, big relief: the goal is fewer decisions between bed and toilet when your brain is still half-asleep. 🌙
Snapshot
This article is for knee replacement patients, family caregivers, and anyone preparing a bedroom-to-bathroom route for the first recovery weeks at home. You will learn how to reduce common night trip hazards, compare simple safety options, and run a 10-minute path test before bedtime.
Before You Act: What This Night Path Plan Can and Cannot Do
This guide is general education for a safer home setup after knee replacement. It is not medical advice, physical therapy instruction, or a substitute for your surgeon’s discharge plan.
After knee replacement, your care team’s instructions come first. That includes weight-bearing limits, walker or cane use, medication timing, wound care, blood clot precautions, and physical therapy guidance. The path setup in this article should support those instructions, not rewrite them.
Think of this as the practical home layer: lighting, floor hazards, walker clearance, toilet support, and caregiver logistics. It is the humble choreography around the medical plan, the part that happens in socks, silence, and sleepy moonlight.
Before you change your setup
Confirm any equipment questions with your surgeon, physical therapist, occupational therapist, or discharge team, especially if you live alone, take sedating medication, feel dizzy, have stairs between bed and bathroom, or need help getting on and off the toilet.
For official patient-safety background, you can review home fall-prevention guidance from the CDC and knee replacement discharge guidance from MedlinePlus.
What this guide is not
It does not tell you whether you personally are safe to walk alone at night. That depends on your balance, strength, alertness, pain level, medication side effects, home layout, and the instructions you received before leaving the hospital or surgery center.
It also does not replace urgent care. Chest pain, shortness of breath, sudden severe calf pain, major wound changes, new confusion, or a fall with injury should be handled as medical concerns, not as home-organization problems.
What this guide can help you do
It can help you make the walk shorter, clearer, brighter, drier, and less mentally demanding. That matters because nighttime movement after knee replacement is not just walking. It is walking while tired, stiff, medicated, and possibly anxious.
The safest setup is usually not fancy. It is boring in the best possible way: no surprise cords, no sliding rugs, no dark corners, no awkward reach for the walker, no heroic bathroom gymnastics.
Who This Is For, and Who Should Pause First
This night bathroom path setup is most useful for people in the first few recovery weeks after total knee replacement who have been cleared to walk at home with a walker, crutches, or cane. It also helps caregivers preparing the home before surgery or before a patient comes home.
Caregivers may find this especially helpful because the patient often notices pain first, while the caregiver notices the room. Both views matter. A knee that feels manageable in the afternoon can feel like a stubborn brass hinge at 3 a.m.
Good fit: the first few weeks at home after total knee replacement
This plan is a good fit when the patient can already perform basic transfers with the mobility aid recommended by the care team. That might mean standing from bed, using a walker, moving through a doorway, turning slowly, and sitting on the toilet with appropriate support.
The plan is also useful if the patient can walk during the day but feels less confident at night. The night version of the house is a different house: quieter, darker, and full of objects that suddenly grow opinions.
Also useful for caregivers setting up a bedroom-to-bathroom route
A caregiver does not need to hover to be helpful. The best support often happens before bedtime: check the floor, park the walker, set the lights, open the bathroom door, place the phone, and agree on how the patient will ask for help.
For a broader family plan, pair this route setup with a written caregiver note system. A simple visit summary can help family members track medication changes, physical therapy instructions, and questions for the next appointment. See this related guide on a doctor visit summary template for caregivers.
Who should pause first
Pause and call the care team before relying on a night bathroom route if the patient has severe dizziness, new confusion, fainting, uncontrolled pain, breathing symptoms, chest discomfort, sudden calf swelling or pain, or drainage or worsening redness around the incision.
Also pause if the only bathroom requires stairs and the patient has not been cleared to use stairs at night. A bedside commode may be safer in the short term, even if it bruises the ego a little. Dignity is not proved by taking unnecessary risks in the dark.
Key takeaway
A night bathroom path is only appropriate when the patient is already cleared for that kind of movement. If symptoms change, the setup changes too.

The 3 a.m. Problem Nobody Prepares For
Daytime walking after knee replacement usually comes with more support. Someone is nearby. Lights are on. The patient is awake enough to think through each step. At night, the brain wants the shortest path and the body wants the slowest one. That mismatch is where trouble sneaks in wearing slippers.
The goal is not speed. It is reducing decisions. The patient should not have to wonder where the walker is, whether the bathroom door is open, whether the floor is dry, or whether the bathmat will bunch under the walker.
Why nighttime bathroom trips are different from daytime walking
Night trips combine several risk factors at once: sleep fog, stiffness after lying still, possible medication side effects, dim lighting, urgency, and a new joint that still needs deliberate movement.
Even a familiar bedroom can become a small obstacle course. The laundry basket that was harmless at 2 p.m. becomes a shin-level ambush after midnight. The phone charger cord becomes a tripwire with excellent timing and no conscience.
The real goal: fewer decisions between bed and toilet
A good setup answers the questions before the patient stands up:
- Where are my glasses?
- Where is the walker?
- Where is the first light?
- Is the path clear?
- Is the bathroom floor dry?
- Where will I place my hands when I sit and stand?
- How do I call for help if something feels wrong?
When those answers are built into the room, the patient can focus on the movement itself.
Short Story: The half-closed door
On her third night home, Elaine felt confident. The bathroom was only ten steps from the bed, and she had walked it twice that afternoon with her daughter watching.
At 2:40 a.m., the hallway looked different. Her walker clipped the edge of the half-closed bathroom door. Nothing dramatic happened. No fall, no crash. Just a jolt of fear sharp enough to wake the whole body.
The next morning, they changed the setup. Door fully open before bed. Motion light inside the bathroom. Walker parked with the handles facing the bed. Phone on the nightstand, not under a pillow.
Elaine later said the biggest improvement was not the light. It was not having to improvise. The path became a script. At night, a script can be mercy.
Start at the Bedside, Not the Bathroom
The bathroom path begins before the feet touch the floor. If the bedside setup is sloppy, the patient may start the trip with reaching, twisting, bending, or searching. Those are not charming opening moves after knee replacement.
Set up the nightstand as a small control center. Not cluttered. Not pretty for guests. Useful.
Put the phone, walker, glasses, water, and light switch within arm’s reach
Before bedtime, place the essentials in the same position every night. Consistency matters because nighttime memory is a foggy clerk.
- Phone on the nightstand, charged and reachable without leaning.
- Glasses in a stable tray or case.
- Walker parked close enough to reach after sitting up, not before.
- Nonskid shoes or secure slippers placed where the feet naturally land.
- Water only if allowed and useful, placed where it cannot spill onto the floor.
- Remote, call bell, or wearable alert if the patient may need help.
If the nightstand already looks like a tiny pharmacy, simplify it. Keep only what belongs to the night path and medication routine. For a deeper bedside setup, use this related guide on a knee replacement nightstand setup.
Create a “pause point” before standing
A pause point is a short habit built into the first movement. Sit on the edge of the bed. Breathe. Notice dizziness. Place both feet. Find the walker. Then stand as instructed.
This pause is not wasted time. It is a safety checkpoint. If dizziness, unusual weakness, confusion, or sharp new pain appears, the next step may be calling for help rather than walking to the bathroom.
Bed height and the first move matter
A bed that is too low can make standing harder. A bed that is too high can make foot placement awkward. Many discharge instructions recommend a bed height that allows the feet to touch the floor when sitting at the edge.
If the bed setup feels wrong, ask the physical therapist or discharge team before improvising with unstable cushions or wobbly risers. A firm, easy-rise chair nearby may help some patients, but it should be part of a safe plan rather than furniture folklore.
Map the Path Like a Runway
A safe night bathroom path is short, wide, dry, and predictable. Map it from the patient’s side of the bed to the toilet, not from the doorway or the center of the room. The route should be based on the actual walker path, including turns.
Do not judge safety by looking down the hallway while standing upright in daylight. Walk the path slowly with the mobility aid, under the same lighting used at night. The house will confess its secrets.
Remove loose rugs, extension cords, laundry piles, shoes, and pet toys
The safest trip hazard is the one that leaves the room. Loose rugs, cords, charging cables, shoes, low baskets, pet bowls, and floor clutter should not be negotiated at night.
If a cord cannot be removed, keep it along the wall and secured so it does not cross the walking route. If a rug cannot be removed, ask whether it is truly worth keeping during recovery. The answer is usually no, and the rug will survive the insult.
Measure walker clearance through doorways and around furniture
Doorways and turns are where many “clear” paths stop being clear. A walker needs enough room not only to move forward but to turn without clipping furniture, door frames, baskets, or bathroom cabinets.
Walk the exact route with the walker. If the front legs bump a cabinet, move the cabinet or change the parking position. If the bathroom door narrows the path, keep it fully open before bed.
For more whole-home setup ideas, this related guide on walker path safety pairs well with this night bathroom plan.
Keep the path boring, because boring is beautiful at 3 a.m.
The path should look almost too plain. No decorative baskets. No small tables. No “I’ll remember that’s there.” After surgery, memory should not be part of the safety equipment.
If you have pets, assume they will choose the worst possible place to nap. Close them out of the route if needed, or have a caregiver manage pet access at night. A beloved dog on a dark floor is still a moving trip hazard with eyelashes.
The 4-zone night path framework
1. Bedside
Phone, glasses, walker, footwear, and first light are reachable.
2. Runway
No rugs, cords, clutter, pet toys, baskets, or tight turns.
3. Bathroom
Dry floor, low-glare light, toilet support, and clear walker parking.
4. Response
Call plan, caregiver backup, and clear rules after dizziness or near-fall.
The Light Trap: Bright Enough to See, Not So Bright You Stagger
Lighting is not decoration during recovery. It is navigation. The path should be visible without blasting the patient awake with a bright overhead light that turns the bathroom into an interrogation room.
The best night bathroom lighting is usually layered: one reachable bedside light, one or two path lights, and one low-glare bathroom light. The patient should be able to see the floor, door frame, walker legs, toilet area, and any floor color changes.
Use motion-activated nightlights along the path
Motion-activated nightlights can help when the patient forgets to turn on a lamp or needs both hands for balance. Plug-in options may be enough for many homes. Battery lights may help in outlets-poor hallways or older bathrooms.
Place lights low enough to show the floor but not so low that they glare directly into sleepy eyes. Test them while walking, not just while admiring them from the doorway.
Avoid harsh overhead light as the first visual shock
A bright overhead light can be useful once the patient is steady, but it is not always the best first light. Some people feel disoriented when they go from darkness to full brightness too quickly.
A softer first light gives the eyes a moment to adjust. If the bathroom has only a harsh overhead fixture, consider a small plug-in nightlight or a low-glare lamp outside the bathroom door, positioned safely away from the walking path.
Test the route in darkness before surgery or before bedtime
Do the lighting test after sunset. Turn off the normal room lights. Use only the lights planned for the nighttime trip. Then walk the route with the mobility aid, slowly, with another person nearby if appropriate.
Look for dark patches, glare, shadows that hide rug edges, and places where the walker legs disappear into visual noise. A patterned rug or dark floor can play tricks on tired eyes.
Bathroom Floor Rules That Matter More Than Decor
Bathrooms are fall-risk factories because they combine hard surfaces, water, tight turns, low toilets, and tempting towel bars that are absolutely not grab bars. After knee replacement, the floor deserves a nightly inspection.
The goal is a dry, flat, predictable surface from the doorway to the toilet. Anything that shifts, bunches, curls, slides, or hides a threshold should be treated as suspicious until proven safe.
Keep the floor dry before bedtime
Water near the sink, toilet, or shower entrance can turn a careful step into a skid. Before bedtime, dry the floor and remove damp towels, washcloths, robes, and shower shoes from the walking route.
If another household member showers at night, make the bathroom floor check part of the routine. Do not assume the patient will notice a wet patch while half-awake.
Use nonslip mats only where they lie flat and stay put
Not every mat is safer. A bathmat that bunches under a walker or slides on tile can be worse than no mat at all. The safest mat is flat, stable, low-profile, and outside the walker turning zone.
If the patient needs a shower mat or tub strips, choose options intended for wet surfaces and confirm placement with the care team if the patient will be showering during the early recovery period. Toilet trips and shower transfers are related but not identical safety problems.
Treat the bathroom doorway as a high-risk zone
Doorways often combine thresholds, tight turns, changing floor surfaces, and door swing. Open the bathroom door fully before bed. If the door blocks walker movement, ask whether it can stay open, be temporarily removed, or be managed another way.
For more detail on this sneaky spot, read the related guide on bathroom doorway fall risks.
Key takeaway
A bathroom floor is safer when it is dry, flat, visible, and boring. If a mat moves, curls, or sits where the walker turns, it belongs somewhere else.
The Last Six Feet: Toilet Setup Without Acrobatics
The last six feet matter because the toilet is not just the destination. It is a transfer station. The patient must approach, turn, back up, lower down, stand again, and reorient toward the bed.
That sequence can be harder than the hallway walk. A low toilet, unstable handhold, wet floor, or poorly parked walker can turn a simple bathroom trip into a very bad puzzle.
Consider a raised toilet seat with arms if the toilet is low
A raised toilet seat may reduce how far the patient has to lower and lift the body. Models with arms can offer more controlled hand placement, but they need to be stable, correctly installed, and appropriate for the patient’s size and bathroom layout.
Do not buy only by price or star rating. Compare height, weight capacity, toilet compatibility, arm stability, cleaning needs, return policy, and whether the equipment fits the patient’s transfer instructions.
For a deeper buying and fit discussion, see this related guide on toilet seat riser height.
Install grab bars beside the toilet, not towel bars pretending to be grab bars
A towel bar is for towels. It is not designed to support body weight during a post-surgery transfer. If the patient needs support near the toilet, ask about properly installed grab bars, toilet safety rails, or other recommended equipment.
If you rent, ask the landlord what temporary or non-damaging options may be allowed, and confirm safety with a qualified professional. Suction-cup devices may look convenient, but they are not the same as properly mounted support.
Park the walker where it does not block the stand-up path
The walker should help the approach, not trap the patient after sitting. Practice the exact toilet transfer during the day with guidance from a physical therapist or caregiver if needed.
Mark the best walker parking spot mentally or with a subtle visual cue that does not create a trip hazard. The patient should not have to invent walker placement at night.
Show me the nerdy details
A toilet transfer has more movement phases than people expect. The patient approaches, aligns the walker, turns in small steps, backs up until positioned correctly, reaches only as instructed, lowers the body, reverses the movement, then exits the bathroom. Each phase can fail for a different reason: poor lighting, low toilet height, unstable hand support, a wet floor, a walker parked too far away, or a rushed pivot.
That is why equipment alone is not the whole answer. A raised toilet seat can help one patient and feel awkward for another. Grab bars can be excellent when properly installed and poorly placed when installed without thinking through the actual transfer path. The best setup is the one the patient can use consistently, slowly, and correctly at night.
Don’t Do This: Bathroom Hacks That Feel Smart but Backfire
Recovery homes often contain improvised solutions. Some are harmless. Some are quietly risky. The problem with a clever shortcut is that it usually works right up until the night it does not.
Use this section as a mistake filter before spending money on equipment, rearranging the bathroom, or deciding the patient can manage alone.
Do not use a towel bar as a grab bar
Towel bars can detach, bend, or spin when used for support. That is not a character flaw. It is simply not their job.
If support is needed, compare proper toilet safety frames, raised seats with arms, or professionally installed grab bars. Ask the care team what is appropriate for the patient’s strength, balance, and bathroom layout.
Do not walk barefoot, in flip-flops, or in loose slippers
Bare feet can slip. Flip-flops can catch or slide. Loose slippers can shuffle forward while the foot stays behind, a tiny betrayal with big consequences.
Use well-fitting footwear with nonskid soles if recommended in the discharge plan. Place it at the bedside so the patient does not have to hunt for it in the dark.
Do not pivot quickly on the operated leg
Turning should usually happen with small, deliberate steps, not a quick twist. Follow the movement instructions your physical therapist gives you, especially for turning with a walker.
The bathroom should be arranged so the patient does not need to pivot sharply to close a door, reach toilet paper, grab clothing, or dodge a bathmat.
Do not kneel, squat, or reach for dropped items at night
If something drops, it can wait. A tissue, pill cap, or sock is not worth a risky bend while sleepy and recovering from surgery.
Keep a reacher tool nearby if recommended, but even then, avoid turning the bathroom trip into a floor-retrieval mission. The mission is toilet, sink if needed, bed. Not archaeology.
Common mistake checklist
- Walker is parked across the room.
- Bathroom door is half-closed.
- Phone charger cord crosses the route.
- Bathmat sits where the walker turns.
- Patient walks barefoot because “it is only a few steps.”
- Caregiver assumes the daytime route is automatically safe at night.
Caregiver Setup: Make Help Available Without Hovering
Good caregiving after knee replacement is not surveillance. It is designing the environment so the patient can keep as much independence as possible while help remains easy to summon.
That balance matters. Too much hovering can feel infantilizing. Too little support can leave a patient trying to prove bravery on a bathroom tile floor. Neither is ideal.
Create a call-and-response plan for the first nights
Agree on the exact phrase, sound, or method the patient will use if they need help. It may be a phone call, text, bell, intercom, wearable alert, or simply calling out if the caregiver sleeps nearby.
Make the response plan specific. “Call me if you need anything” is kind, but vague. Better: “Text or ring once before you stand if you feel dizzy, weak, confused, or unsure.”
Use a bedside commode if the bathroom path is too risky
A bedside commode may be worth discussing when the bathroom is far away, stairs are involved, the hallway is narrow, the patient lives alone, or nighttime urgency makes walking feel rushed.
This is not a failure of recovery. It is a temporary risk-reduction tool. The best choice is the one that gets the patient through the early recovery period safely.
Keep dignity intact while reducing fall risk
Caregiving around bathroom use can feel tender and awkward. Use practical language. Ask what the patient wants help with and what they want to do privately. Set up the room so privacy is possible without sacrificing safety.
If multiple siblings or relatives are sharing care, assign roles instead of assuming everyone knows what to do. A simple schedule can prevent both over-helping and vanishing acts. For family coordination, see how siblings can help after joint replacement.
When to Seek Help Before the Next Bathroom Trip
A better night path reduces ordinary fall hazards. It does not make concerning symptoms safe. If the patient feels newly dizzy, confused, weak, short of breath, or unusually unstable, pause before walking.
After knee replacement, some symptoms should be discussed promptly with the surgeon or medical team. Others may require urgent care. When in doubt, use the instructions provided at discharge.
Call the surgeon for worsening pain, calf swelling, or concerning wound changes
Contact the surgeon or care team for symptoms such as pain that is not improving with medication, new or worsening calf swelling or pain, fever, drainage, increasing redness or swelling around the incision, or bleeding that soaks the dressing.
Do not treat these as lighting problems or walker-placement problems. The body may be sending a message that belongs in the medical inbox.
Seek urgent help for chest pain, shortness of breath, or breathing problems
Chest pain, shortness of breath, sudden breathing difficulty, fainting, or severe new symptoms should be treated urgently according to the discharge instructions and local emergency guidance.
A patient who feels too unsteady to walk should not try to “just make it” to the bathroom. Use the call plan. Ask for help. Safety outranks politeness.
Reconsider the setup after any stumble, near-fall, or new dizziness
A near-fall is information. Do not shrug it off because “nothing happened.” Something almost happened, and the path should be reassessed before the next night.
Ask: Where did the stumble happen? Was the light too dim? Was the walker too far away? Did the patient pivot? Was there urgency, dizziness, or medication timing involved? A near-fall deserves a small investigation, not a lecture.
Key takeaway
A stumble is not proof that the patient failed. It is proof that the setup needs another look.

FAQ
How soon after knee replacement can I walk to the bathroom at night?
Follow your discharge instructions. Many patients are expected to walk at home with a walker or crutches when they leave the hospital or surgery center, but whether you should walk to the bathroom alone at night depends on your balance, pain, alertness, medication effects, home layout, and care team guidance.
Should I use a bedside commode after knee replacement?
A bedside commode may be useful if the bathroom is far away, stairs are involved, the route is narrow, the patient lives alone, or nighttime urgency creates risk. Ask your surgeon, physical therapist, occupational therapist, or discharge team what fits your situation.
Is a raised toilet seat necessary after knee replacement?
Not always. Some patients manage safely with a standard toilet, while others benefit from a raised seat or toilet safety frame. The deciding factors include toilet height, leg comfort, strength, balance, bathroom space, and transfer instructions.
What kind of nightlight is best after knee surgery?
The best nightlight is bright enough to show the floor and walker path without causing glare. Motion-activated lights, plug-in lights, and battery path lights can all work if they are placed safely and tested during an actual nighttime route walk.
Can I go to the bathroom alone after knee replacement?
Only if your care team has cleared you to do so and you feel steady, alert, and able to follow your walker or cane instructions. If you feel dizzy, confused, unusually weak, rushed, or unsure, call for help before standing.
Should I use my walker inside the bathroom?
Use your mobility aid as instructed by your care team. Many bathrooms are cramped, so practice the approach, turn, walker parking, and toilet transfer during the day. If the walker does not fit safely, ask about alternatives rather than improvising at night.
Are bathroom rugs safe after knee replacement?
Loose bathroom rugs are often risky because they can slide, curl, or bunch under a walker. If a mat is used, it should lie flat, stay put, and remain outside the walker turning zone. When unsure, remove it for the early recovery period.
What should I do if I almost fall at night?
Pause and reassess before the next bathroom trip. Tell your caregiver or care team, especially if dizziness, weakness, pain, or medication timing may have contributed. Fix the specific hazard rather than assuming it was a one-time wobble.
Next Step: Do the 10-Minute Night Path Test Tonight
The simplest next step is not buying equipment. It is testing the route you already have. Tonight, before the patient is tired, walk the bedroom-to-bathroom path under the same lighting planned for nighttime.
Use the actual walker, cane, or crutches. Wear the actual nighttime footwear. Open the bathroom door the way it will be open at bedtime. Place the phone, glasses, and walker exactly where they will be. Then move slowly from bed to toilet and back.
If you discover a problem, treat it as a useful finding, not a failure. Move the basket. Remove the rug. Add the light. Change the walker parking spot. Ask for help with a toilet riser or commode decision. The route does not need to be elegant. It needs to be reliable.
For a broader pre-surgery safety sweep, pair this with a fall risk checklist before surgery. If furniture is crowding the route, this guide on furniture and walking fall risk can help you spot the quiet hazards hiding in plain sight.
Final practical promise
In 10 minutes, you can make the night bathroom trip less dependent on memory, luck, and sleepy confidence. That is the quiet win: a safer route before the house goes dark.
Last reviewed: 2026-07