
Written from a family caregiver perspective. The operator cares for an older mother with rheumatic, spinal and knee problems and is not a medical professional. This article offers general information, not individual clinical clearance.

A safer home-recovery seating guide
Chair Armrests and Fall Prevention
After Knee Surgery
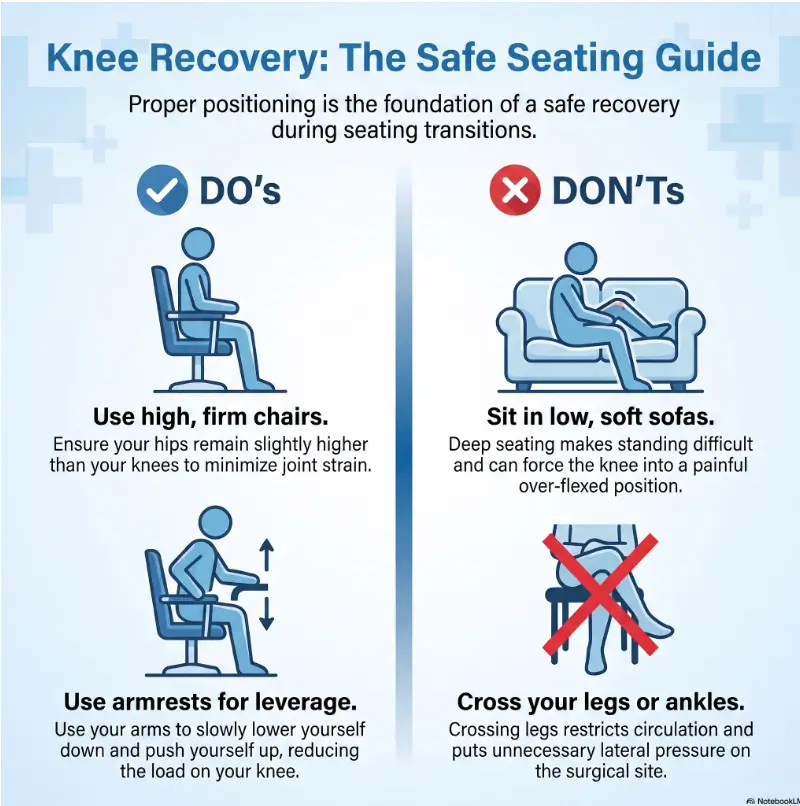
The most dangerous chair after knee surgery is not always the obviously wobbly one. It may be the familiar sofa that lets the hips sink too low, the recliner with a long sideways reach, or the dining chair that quietly skates backward when someone pushes on its arms.
Secure armrests can give a recovering patient two controlled push points during sitting and standing. Yet armrests are only one part of the transfer. Seat height, floor grip, walker placement, footwear, surgical restrictions, pain, swelling, medication effects, and the route around the chair all enter the room together.
This guide turns the vague instruction to “use a firm chair with arms” into a practical inspection, comparison, and caregiver trial. You will learn how to choose one dependable recovery chair, spot false security, avoid wasted purchases, and know when a physical or occupational therapist should assess the setup.
The goal is not a perfect furniture showroom. It is one predictable landing place that behaves the same way every time. 🪑
Snapshot
Who it is for: adults recovering from knee replacement, arthroscopy, ligament or tendon repair, fracture surgery, and the caregivers preparing their homes. What it solves: uncertainty about armrests, seat height, walker access, chair types, and transfer risks. What you can do next: inspect one chair, clear its approach, and ask the rehabilitation team to confirm the setup.
Table of Contents
READER WORKSHEET
Recovery chair review sheet
Record the chair features and transfer questions to review with your therapist.
Confirm and prepare
Add your working notes
Keep names, account numbers, member IDs, and other identifying details out of this worksheet.
Complete your worksheet to organize the next step. Blank amounts remain unknown.
How to use the result: This is not a chair-rise test or safety score. Do not test an unsupported transfer to complete it.
This worksheet does not save entries between visits or send them to a provider. Download before leaving; the downloaded file may contain your notes. It is a planning aid, not a diagnosis, safety assessment, coverage decision, or final bill.
Before You Act: The Chair Must Match the Recovery Plan
This article offers general home-safety education. It cannot determine how much weight a particular patient may place on the operated leg, how far the knee may bend, whether a brace may be unlocked, or whether the patient requires hands-on assistance.
Those instructions must come from the surgeon, physical therapist, occupational therapist, or another member of the rehabilitation team. The same chair may be reasonable after an uncomplicated knee replacement and unsuitable after fracture fixation, quadriceps tendon repair, or a procedure requiring limited weight bearing.
Safety / Disclaimer
Use the patient’s written discharge instructions as the controlling guide. Confirm transfer technique, weight-bearing status, brace position, mobility aid, and assistance level before practicing at home. Do not improvise furniture risers, transfer methods, or caregiver lifting techniques when the instructions are unclear.
Who needs an individual assessment?
A routine home inspection may be enough for a steady patient who has practiced transfers successfully and has clear instructions. Individual assessment becomes more important when the patient has experienced falls, knee buckling, dizziness, confusion, poor vision, weakness in both legs, significant upper-body pain, strict movement limits, or difficulty remembering the transfer sequence.
It is also worth asking for professional help when every available chair is low, soft, armless, unstable, or difficult to approach with the prescribed mobility aid. An occupational therapist can look beyond the chair and evaluate the full task, including flooring, lighting, clothing, footwear, nearby objects, caregiver positioning, and bathroom needs.
Four questions to ask before discharge
- How much weight may the patient place on the operated leg?
- Where should the operated leg be positioned while sitting down and standing up?
- Should the patient use a walker, crutches, cane, brace, or hands-on assistance for every transfer?
- Can the therapist watch one transfer using a chair similar in height and firmness to the chair at home?
Preparing the route matters too. A chair can pass every furniture test and still sit at the end of a hazardous path. Use the related pre-surgery fall-risk checklist to inspect lighting, rugs, cords, pets, and turning space before the patient comes home.
Key takeaway: A chair is not safe in isolation. It must fit the patient’s restrictions, mobility aid, practiced transfer method, and current assistance level.
Why Armrests Matter More Than They Look
The vulnerable seconds between sitting, standing, and walking
A transfer has several phases. The patient moves toward the edge of the seat, positions the feet, shifts the trunk, pushes upward, finds balance, and then transitions to the walker or other mobility aid. A rushed hand movement during any one of those phases can turn an ordinary chair into a small obstacle course.
Two secure armrests offer symmetrical places to press downward. They can help the patient control speed while lowering and provide upper-body support during the first portion of standing. They also give the hands a known destination, which is useful when pain, fatigue, medication effects, or anxiety have made movement less automatic.
Official knee-replacement planning guidance commonly calls for a stable recovery chair with a firm seat, firm back, and two arms. It also emphasizes removing loose rugs and cords and leaving enough room to use a walker or crutches. AAOS home-planning guidance
Armrests are push points, not decorative trim
An armrest that merely looks substantial may flex, loosen, compress, or separate from the chair under downward force. The important question is not whether the armrest feels pleasant under the elbow. It is whether the structure can accept the kind of controlled push the patient was taught to use.
Look at how the arm connects to the chair frame. Check for loose screws, cracked wood, bent metal, separating joints, unstable upholstery, or padding that hides movement. Press down and slightly forward with both hands while another adult watches the chair legs and floor contact.
Here is what furniture advice often misses: placement matters
The safest chair in the house becomes less useful when it faces a narrow coffee table, sits on a curling rug, or requires the patient to twist around a side table before reaching the walker. The approach should allow the patient to turn using the technique taught by the therapist, back up until the chair is correctly located, and reach the armrests without a sideways lunge.
Clear enough space for the entire mobility aid, not merely the patient’s feet. A walker-friendly route should remain open even when the recliner footrest, laundry basket, pet bed, charging cord, and caregiver chair are in their ordinary positions. The walker path safety guide provides a broader route check for hallways and room transitions.
The Two-Inch Trap: Small Height Changes, Big Transfer Differences
Why a low seat can feel dramatically harder
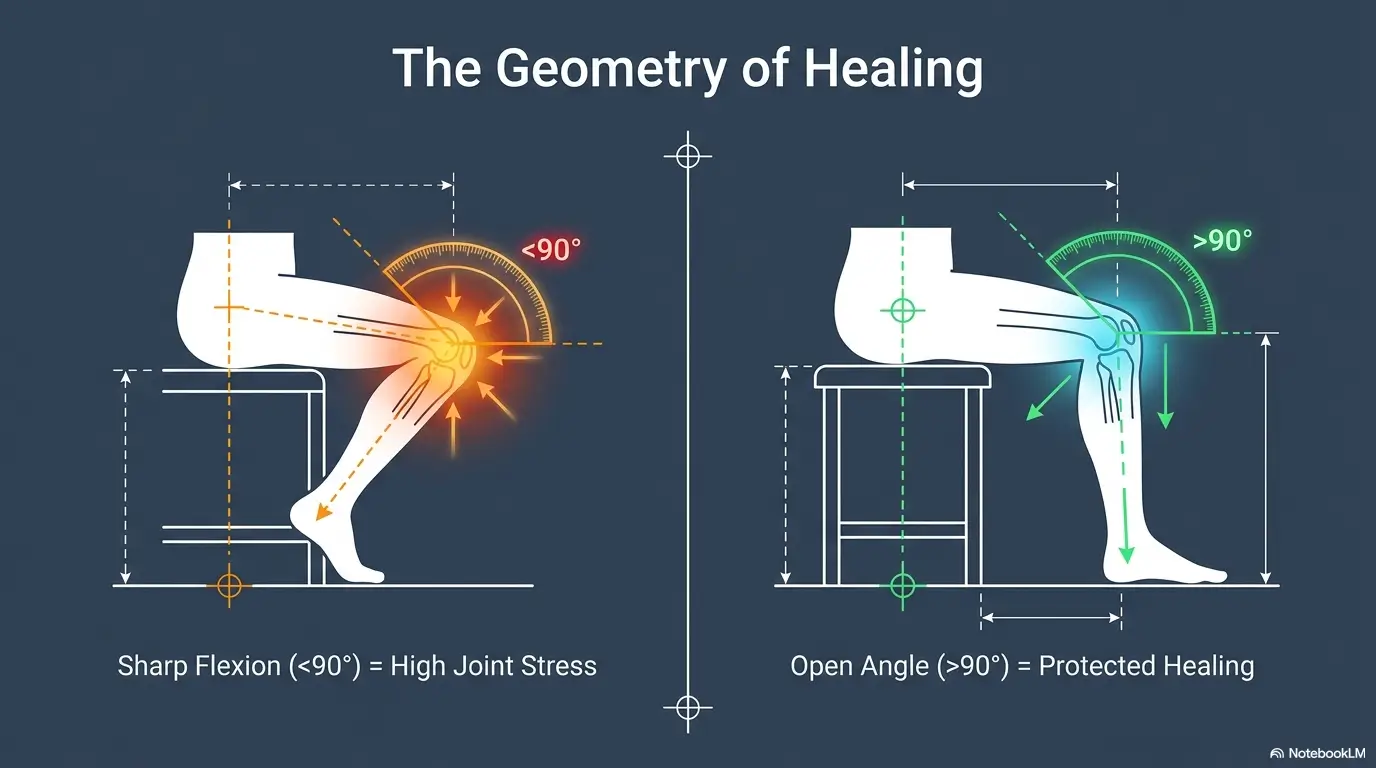
Lower seats generally require more knee and hip bending before the body can rise. They may also require the patient to move the upper body farther forward and generate more force through the legs and arms. Early after surgery, swelling, pain, weakness, and a brace can make that extra distance feel far larger than it looks.
A difference of a few inches may separate a controlled transfer from a deep, uncertain push. Still, there is no universal seat height for every body and operation. A tall patient, a shorter patient, and a patient with a locked brace will not interact with the same chair in the same way.
AAOS total knee replacement guidance lists an 18-to-20-inch firm seat as a common home-planning reference. Treat that range as a starting point for discussion, not a personalized prescription. Body proportions, footwear, cushion compression, surgical restrictions, and the therapist’s technique all matter. AAOS recovery-chair reference
Use the feet-flat test, then watch the whole movement
When seated, the patient should generally be able to establish secure foot contact in the position specified by the rehabilitation team. A chair that is too high can leave the feet poorly supported, encourage sliding toward the edge, or make sitting down feel like stepping off a curb backward.
Do not stop at a seated measurement. Watch the approach, the turn, the hand placement, the moment the hips leave the chair, the pause after standing, and the transition to the walker. A chair can look ideal while occupied and still be awkward during the first or final six inches of movement.
Cushions and risers: useful tools or expensive wobble?
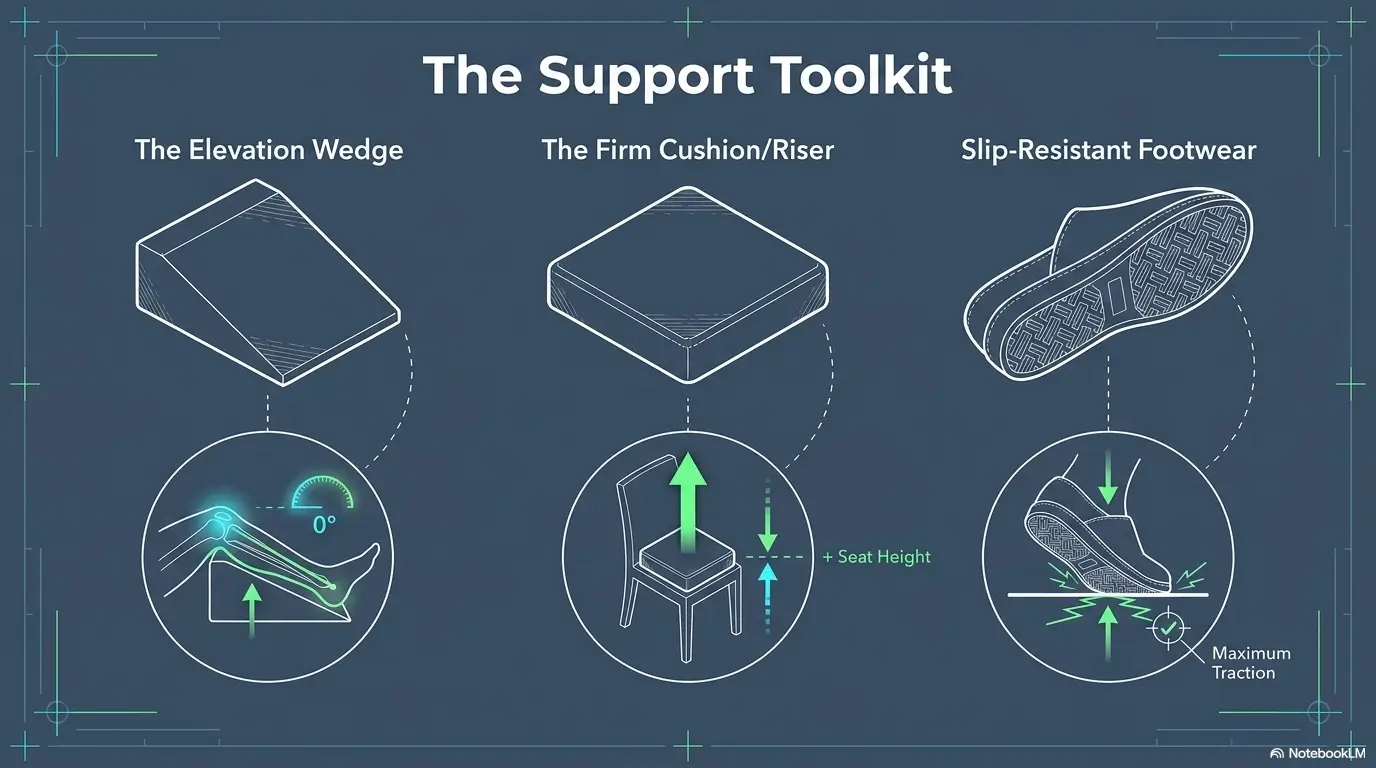
A single firm cushion designed to remain stable may improve a low seat in some situations. It must not slide, fold, tip, bunch, or make the patient perch near the front edge. The cushion should also leave enough usable armrest height for a strong downward push.
Stacked bed pillows are usually poor engineering. They compress unevenly, change shape during lowering, and may raise the hips without giving the feet or armrests a better relationship to the seat.
Furniture risers can introduce a more serious problem. A chair that was stable on four legs may become less stable when placed on narrow, mismatched, or poorly secured platforms. Ask an occupational therapist before raising furniture, particularly when the chair will receive forceful or uneven loading.
| Height-adjustment option | Possible advantage | Main concern | What to verify |
|---|---|---|---|
| Existing firm seat | No added components | May still be too low or too high | Feet, knee position, arm reach, full transfer |
| One firm nonslip cushion | Simple, removable height change | Sliding, tipping, reduced armrest usefulness | Secure fit and therapist-approved height |
| Purpose-built elevated seating | More predictable dimensions | Cost, width, return restrictions, fit | Seat height, depth, weight rating, arm structure |
| Furniture risers | Raises the entire chair | Instability or uneven loading | Professional approval and secure installation |
| Stacked pillows | Already available | Compression and unpredictable movement | Usually replace with a firmer, safer option |
Show me the nerdy details
Standing from a chair requires the body’s center of mass to move forward and upward over the feet. A lower or softer seat generally increases the movement required before the hips clear the chair.
Armrests can share part of the effort by allowing force through the hands and upper limbs. That benefit depends on the arms being reachable, structurally secure, and positioned so the patient can press without twisting or leaning heavily to one side.
The practical lesson is simple: seat height, firmness, foot position, armrest geometry, and technique work as one system. Changing one component can alter the others.
The Seven-Point Chair Safety Test
Run this test before surgery when possible. A caregiver can inspect the chair without asking a newly discharged patient to become the household crash-test dummy.
The Recovery Chair Safety Flow
Run these seven tests in order
- Stability: The chair does not rock, roll, swivel, fold, slide, or tip when pressure is applied.
- Seat firmness: The cushion supports the hips without swallowing them or pitching the body backward.
- Seat height: The patient can use the prescribed leg position without an excessive drop or deep squat.
- Armrest height: Both hands can press down without the shoulders rising sharply or the body leaning sideways.
- Armrest length: The hands can find support before the patient commits body weight to the transfer.
- Foot and base clearance: Shoes, brace hardware, walker tips, and crutches do not catch on a pedestal, crossbar, footrest, or flared chair leg.
- Approach space: The patient can turn, back up, and position the mobility aid without sidestepping around clutter.
Test the floor, not just the chair
A wooden chair may feel solid on carpet and slide on polished flooring. Rubber feet may grip when dry and move differently on dust, moisture, or an uneven tile joint. Test the actual chair in the actual location where it will be used.
A loose rug beneath the chair is not a reliable nonslip solution. It creates additional edges for the walker and shoes to catch. Do not place a chair partly on and partly off a rug, since the resulting height difference can create rocking.
Give the chair a red, yellow, or green score
| Score | What it means | Next action |
|---|---|---|
| Green | Passes all seven checks and fits the prescribed transfer | Mark its location and keep the approach clear |
| Yellow | One issue may be correctable, such as nearby clutter | Correct it, then repeat the entire test |
| Red | Slides, rocks, rolls, swivels, sinks deeply, lacks secure arms, or conflicts with restrictions | Do not use it until the hazard is corrected and the setup is approved |
Key takeaway: This informal checklist is not a validated fall-risk score or clearance for independent transfers. One red structural problem outweighs several green comfort features. A plush chair with loose arms is still a red chair.
Sit-to-Stand Without the Scramble
The rehabilitation team’s instructions take priority over any general sequence. The following framework helps caregivers understand the moving parts so they can prepare the space and recognize when a step is being skipped.
Before standing: prepare everything before anything moves
- Wear secure, well-fitting footwear recommended by the care team.
- Move to the front portion of the seat using the practiced method.
- Place the feet and operated leg exactly as instructed.
- Confirm the brace setting, if a brace is prescribed.
- Place both hands on stable armrests unless the therapist has taught another method.
- Position the walker close enough to reach after standing, but not where it blocks the feet or catches the chair.
- Ask the caregiver to stand in the location demonstrated during training.
Push, stand, then pause
A common mistake is trying to pull up on the walker. A standard walker may move, tilt, or slide when used as a lifting handle. The usual principle is to push from the stable seating surface, complete the rise, establish balance, and then move the hands to the walker as instructed.
The pause matters. Standing quickly can be followed by dizziness, pain, knee instability, or a momentary loss of orientation. The patient should not begin walking simply because the hips have cleared the chair.
MedlinePlus instructs knee-replacement patients to use walkers or crutches as directed, avoid twisting or pivoting with a walker, and practice the correct way to get in and out of a chair before relying on the skill at home. MedlinePlus knee-replacement discharge guidance
Sitting down: confirm the seat before lowering
The patient typically approaches and turns using the prescribed mobility pattern, then backs toward the chair until its position has been confirmed. The hands move from the walker to the chair supports according to the therapist’s sequence, and the patient lowers with control.
Dropping the final few inches places greater demand on the chair, the operated knee, and the caregiver. It can also shift a cushion that seemed secure during the first half of the descent. Controlled lowering is one reason the armrests must remain reachable throughout the transfer.
Wait, where does the walker go?
There is no single parking position that suits every room, walker, patient, and transfer method. The correct spot keeps the aid reachable after standing without forcing the patient to pull on it, step around it, twist toward it, or trap a foot inside its frame.
Mark the position during supervised practice. A small piece of removable tape placed away from the walking line can help a caregiver remember where the front legs of the walker should be. Do not create a raised edge or visual clutter that becomes a new trip hazard.
Key takeaway: The safe sequence is not “chair, then walker.” It is prepare, push, stand, stabilize, transition, and only then begin walking.
Illustrative planning example
Illustrative example, not a reported patient case: a household has an unanswered question about chair stability, arms, seat and surrounding space. The useful next step is to record the uncertainty, identify who can answer it and agree on a follow-up action, rather than assume that a familiar routine is suitable.
False Security: When Good-Looking Armrests Still Fail
Chairs that deserve immediate suspicion
- Rolling office chairs: wheels can move during push-off or lowering.
- Swivel chairs: the seat may rotate while the feet remain planted.
- Rocking chairs and gliders: the base moves when the patient expects a fixed support.
- Deep sofas: soft cushions may lower the hips and place the arm supports too far away.
- Lightweight patio chairs: they may slide, flex, or tip under uneven force.
- Folding chairs: hinges, narrow seats, and light frames introduce avoidable uncertainty.
- Wide recliners: they may require a long sideways reach or leave the patient far from the armrests.
- Pedestal chairs: the central base may interfere with foot or walker placement.
Comfort does not cancel mechanics. A favorite recliner can feel supportive while seated and still create a difficult exit. Powered lift features may reduce part of the physical effort, but they do not automatically solve foot placement, walker access, sliding, brace clearance, dizziness, or safe lowering during a power interruption.
The hidden danger of one-sided pushing
Patients sometimes place one hand on an armrest and reach the other hand toward the walker, a table, or a caregiver. This divides attention and can rotate the trunk while body weight is changing direction.
One-sided pressure can also reveal a chair’s weak point. A chair that feels stable under equal pressure may tip or shift when force is applied near one corner. Test both symmetrical and modestly uneven pressure without placing a recovering patient at risk.
Do not let the chair begin a chain of furniture walking
The patient stands, leaves the walker a little too far away, touches the side table, reaches for the sofa back, and arrives at the walker through a chain of unstable supports. Each object feels close enough to borrow for one second.
That pattern is called furniture walking in everyday conversation, and it deserves attention because household furniture is rarely designed as a continuous mobility system. Read the furniture-walking fall-risk guide with caregivers who may be tempted to place tables and chairs as stepping stones.
| Common mistake | Why it fails | Safer alternative to discuss |
|---|---|---|
| Pulling on the walker | The walker may tilt or move | Push from approved armrests, stabilize, then take the walker |
| Stacking pillows | Uneven compression changes the landing | Use a single stable solution approved for the patient |
| Using a rolling chair | The base can move during transfer | Choose a fixed four-leg chair |
| Reaching for a side table | Tables may slide or tip | Keep the prescribed mobility aid correctly positioned |
| Placing the chair on a loose rug | The rug or chair may shift | Use a stable surface and clear floor transition |
| Abandoning the walker near the chair | The first steps remain a fall-risk period | Follow the prescribed aid plan until formally changed |
Match the Chair to the Surgery, Not the Furniture Catalog
Knee replacement and arthroscopy are not interchangeable
After total or partial knee replacement, early transfers may be affected by swelling, pain, quadriceps weakness, fatigue, medication effects, and the temporary use of a walker. A firm, somewhat elevated seat with two secure arms is commonly included in home-preparation guidance, but the rehabilitation team should confirm the fit.
Arthroscopy may involve smaller incisions, but the recovery plan depends on what was treated. A simple diagnostic procedure, meniscus repair, cartilage procedure, and ligament reconstruction can carry very different weight-bearing and movement instructions. “Only arthroscopy” is not a chair specification.
Ligament and tendon repairs: the brace changes the geometry
A long brace can limit knee bending, change foot placement, catch on the front edge of a chair, or make the patient extend the operated leg farther forward. The chair therefore needs enough approach space and front clearance for the prescribed movement.
Do not unlock a brace, change its range setting, or remove it to make a chair easier to use unless the surgical team has specifically permitted that change. The furniture must accommodate the medical plan, not negotiate with it.
Fracture surgery and complex repairs may require more than armrests
Some patients must protect the operated limb from partial or full loading. Others may require a transfer board, a wheelchair setup, a higher level of caregiver assistance, or a different seating surface altogether.
When the patient cannot reliably follow restrictions, has significant weakness in the unoperated leg, or needs another person to lift or steady them, do not assume a stronger chair is the missing ingredient. Ask for hands-on training and an equipment recommendation.
The discharge instructions win every tie
Generic advice cannot see the surgical report, fixation, tissue quality, nerve block effects, wound, medication list, or the patient’s performance in therapy. When a blog tip conflicts with written or demonstrated instructions, use the clinical instructions and ask the team to explain the difference.
Room-by-Room Seating: Where Falls Quietly Begin
The living-room recovery chair receives most of the attention, but transfers occur wherever people dress, eat, rest, use the toilet, or wait for a caregiver. Inspect each room according to the task performed there.
Living room, bedroom, and kitchen
| Room | Chair purpose | Common hidden risk | Practical correction |
|---|---|---|---|
| Living room | Main rest and transfer station | Deep sofa, footstool, cords, remote reaching | Use one firm chair and place essentials within safe reach |
| Bedroom | Dressing and short rests | Clothing on floor, dim nighttime route | Add stable seating and clear the path to the bathroom |
| Kitchen | Planned rest during light tasks | Spills, narrow walker route, rolling stool | Use a fixed chair outside the main work triangle |
| Dining area | Meals | Chair pulled over rug edge or trapped under table | Create space behind the chair before the patient arrives |
| Porch or patio | Fresh air and visits | Moisture, uneven paving, light furniture | Use only stable outdoor seating on a dry, level surface |
In a small home, one carefully chosen chair may serve several purposes. The knee-replacement apartment setup guide explains how to create a compact recovery zone without filling every room with equipment.
In the kitchen, place seating where the patient can rest without blocking cabinet doors, appliance doors, or the walker route. The related walker-friendly kitchen guide covers work surfaces, carrying methods, and safer traffic flow.
Bathroom supports are a different category
Do not use a vanity, towel rack, ordinary chair, shower door, or nearby shelving as a substitute for approved bathroom support. Wet floors, confined spaces, clothing management, and toilet height create a different transfer problem.
A raised toilet seat, toilet safety frame, securely installed grab bars, or an appropriate commode may be considered according to professional guidance. Check the toilet seat riser height guide before comparing equipment, and confirm the final setup with the rehabilitation team.
Official home-safety guidance recommends clear pathways, removal of unstable furniture, avoidance of seats that are too low to rise from, and secure bathroom supports rather than improvised handholds. MedlinePlus home preparation
Build a recovery station without creating a barricade
- Place the phone, water, medication schedule, tissues, and frequently used controls within the reach approved by the therapist.
- Keep the walker’s path open on both sides of the chair.
- Avoid low tables that encourage forward or sideways leaning.
- Route charging cords along walls, never across the transfer zone.
- Use a stable container rather than stacking loose items on the armrest.
- Keep pets out of the transfer area until the patient is seated or safely walking.
Key takeaway: “Within reach” does not mean “surround the chair.” Leave the patient a clean runway for the walker, feet, brace, and caregiver.
The Caregiver’s Five-Minute Chair Trial
Inspect first, practice second
- Press each armrest: Listen and watch for flexing, cracking, looseness, or separation.
- Load the chair unevenly: Apply modest pressure near each side while watching for tipping or sliding.
- Simulate the approach: Move the walker along the patient’s actual route and confirm turning clearance.
- Remove interference: Clear rugs, cords, footstools, side tables, baskets, and pet items.
- Practice under supervision: Use the therapist’s exact instructions, then stop if pain, buckling, confusion, or instability appears.
Do not have the caregiver pull upward on the patient’s arms or clothing unless a clinician has taught a specific hands-on technique. Untrained lifting can injure both people and may pull the patient away from the intended base of support.
Good, better, and best recovery-chair setups
| Setup | Best fit | What it includes | What to verify before spending |
|---|---|---|---|
| Good | Patient with clear instructions and a suitable existing chair | Firm fixed chair, secure arms, clear path, correct walker position | Actual transfer performance and floor grip |
| Better | Existing furniture is low, soft, or poorly sized | Purpose-selected chair or therapist-approved firm height adjustment | Seat height, depth, width, arm height, weight capacity, return policy |
| Best | Complex surgery, prior falls, cognitive concerns, strict restrictions, or caregiver difficulty | Occupational therapy home assessment plus recommended equipment and training | Coverage, referral requirements, visit scope, equipment responsibility |
The lowest-cost setup is often an existing chair that genuinely passes the test. Buying more equipment does not create more safety when the dimensions are wrong or the patient has not practiced the transfer.
When purchasing or renting seating, compare usable seat height after cushion compression, seat depth, width between the arms, armrest height, frame construction, weight capacity, return terms, assembly requirements, and whether the chair can be tested before delivery. Ask whether the item is considered returnable medical equipment once opened.
When professional help may be worth the cost
A professional home assessment becomes easier to justify when a failed transfer could have serious consequences, multiple rooms require modification, caregivers disagree about the safest method, or the patient’s function changes from day to day.
Before paying privately, ask the surgeon’s office, rehabilitation provider, or insurer whether occupational therapy home-safety services require a referral, whether telehealth assessment is available, and whether durable medical equipment benefits may apply. Coverage and eligibility vary, so obtain plan-specific confirmation rather than relying on a retailer’s description.
Money-saving checkpoint: Measure and test before buying. A nonreturnable “recovery chair” that is too deep, too wide between the arms, or too slippery is expensive furniture with excellent intentions.
Recheck when the recovery changes
Chair safety is not a one-time certificate. Retest after a mobility aid changes, a brace is adjusted, swelling increases, medication is changed, the patient becomes more independent, or the chair is moved to another floor surface.
Improvement can introduce its own problem. A patient who feels stronger may move faster, skip the pause, reach for the walker early, or stop using the prescribed aid before the care team agrees. Confidence is welcome, but the transfer sequence should not quietly evaporate.
When to Seek Medical or Rehabilitation Help
Request transfer retraining after near-falls
Contact the physical or occupational therapist when the patient repeatedly misses the armrest, pulls on the walker, drops into the seat, forgets restrictions, buckles at the knee, requires more assistance than expected, or has a near-fall.
Also request help when a caregiver feels unsafe. A caregiver who is bracing with a twisted back, grabbing clothing, or trying to catch the patient after movement has begun needs a clearer plan, not more courage.
After a fall, do not use the chair guide as a diagnosis tool
Follow the surgical team’s instructions for reporting falls. Contact the team promptly after a fall involving the operated limb, new severe pain, visible deformity, wound disruption, bleeding, new weakness, unusual swelling, or a sudden inability to bear the amount of weight previously permitted.
Do not force the patient to stand solely to prove that the knee is unharmed. Emergency services may be appropriate when the patient cannot rise safely, may have struck the head, has severe symptoms, lost consciousness, or may have sustained a significant injury.
Know the blood-clot warning signs
Report new or increasing calf or leg pain, tenderness, redness, discoloration, or swelling according to the surgical team’s instructions. Sudden shortness of breath, sudden chest pain, chest pain with coughing, coughing blood, faintness, or severe breathing difficulty requires urgent emergency evaluation.
Orthopaedic guidance identifies leg swelling, pain or tenderness, redness, and related changes as possible signs of deep vein thrombosis. A clot that travels to the lungs can cause sudden shortness of breath or chest pain and is a medical emergency. CDC blood-clot warning signs
Ask for an occupational therapy assessment when no chair passes
An assessment can help when the home contains only low sofas, narrow dining chairs, unstable furniture, difficult flooring, tight bathroom spaces, or several level changes. The therapist may recommend a different chair, approved equipment, task changes, caregiver training, or a temporary recovery area on one floor.
Bring photographs and measurements if an in-person visit is unavailable. Include the chair from the front and side, seat height, seat depth, width between the arms, armrest height, floor surface, walker approach, and a wide image showing nearby obstacles.
FAQ: Chair Armrests After Knee Surgery
Are armrests necessary after knee replacement surgery?
Secure armrests are commonly recommended because they provide controlled push points during sitting and standing. A therapist may teach a different setup for a particular patient, so confirm the transfer method before discharge.
How high should a chair be after knee surgery?
There is no universal height. AAOS materials use 18 to 20 inches as a common reference for a firm recovery seat after total knee replacement, but the correct height depends on body proportions, cushion compression, footwear, brace position, procedure, and transfer instructions. Test the whole transfer with the therapist.
Is a recliner safe after total knee replacement?
It may be safe for some patients if it is firm, stable, appropriately sized, easy to approach, and approved for the prescribed transfer. Deep or wide recliners can make standing, hand placement, foot placement, and walker access more difficult. A powered lift does not automatically make the full transfer safe.
Can I use a cushion to raise a low chair?
A single firm, secure cushion may be considered when it remains flat and does not slide or tip. It can also reduce the useful height of the armrests, so the revised setup should be tested. Avoid stacked pillows and unapproved improvised platforms.
Should I push from the armrests or pull on my walker?
The common approach is to push from stable armrests, stand, establish balance, and then transition to the walker. Pulling on a walker can make it tilt or move. Follow the exact method taught by the patient’s physical or occupational therapist.
What type of chair should I avoid after knee surgery?
Avoid rolling, swiveling, rocking, folding, unstable, very low, deeply cushioned, or easily sliding chairs unless a rehabilitation professional has specifically assessed the setup. Decorative armrests that cannot accept downward pressure should not be treated as transfer supports.
How should I sit down while wearing a knee brace?
Use the leg position, brace setting, weight-bearing limit, and hand sequence prescribed by the surgical or rehabilitation team. The chair must provide enough front clearance for the braced leg without forcing a twist or sudden drop.
When can I stop using a chair with arms?
Do not use a calendar alone. Ask the therapist when the patient has sufficient strength, balance, control, and consistency to use another chair safely. The answer may differ between a higher dining chair, low sofa, toilet, car seat, and outdoor chair.
What should I do if the chair slides when I stand?
Stop using that setup until the sliding hazard is corrected and the setup has been assessed. Move the chair only if a safer level surface is available, then retest it. Do not assume a loose rug or improvised block will solve the problem. Ask a therapist about an appropriate nonslip or alternative seating solution.
Mark One Chair as the Recovery Chair Today
You do not need to redesign the entire home in one afternoon. Start with the chair the patient will use most often during the first stage of recovery.
Your 15-minute action
- Choose the firmest fixed chair with two secure armrests.
- Press each arm and check every leg for movement.
- Remove rugs, cords, low tables, pet items, and footstools from its approach.
- Place the prescribed walker where it can be reached after standing without blocking the feet.
- Photograph and measure the setup for the physical or occupational therapist.
Then ask one precise question: “Can you confirm that this chair, height, walker position, and transfer sequence fit my restrictions?” That question is more useful than asking whether the chair merely looks safe.
The humble armrest is not a force field. It is one reliable note in a short piece of choreography: feet placed, hands supported, chair still, walker ready, body paused. When those parts agree, the room becomes quieter, and the next transfer asks less from luck.
Last updated: October 14, 2026
Review the chair without creating a transfer test
Use these prompts for a private note or your next care-team conversation. Record what is known and mark unanswered questions; completing this table does not establish safety, independence or treatment eligibility.
| Record or clarify | Question and next action |
|---|---|
| Chair stability, arms, seat and surrounding space | Can the therapist assess this actual chair and any proposed equipment? |
| Usual transfer instructions | Which hand supports and assistance are prescribed for this operation? Do not remove support to demonstrate progress. |
| An unsuitable chair | What temporary seating and help arrangement should be used while it is replaced or assessed? |
Keep the person’s own report separate from a helper’s observation. Share only with consent and only with people who need the information. Do not put identifying health details in public comments. The visit preparation tool can organize questions; it cannot assess symptoms or approve a task.
Background resource: NHS: moving and handling support. This resource supports general care planning; it does not validate every instruction elsewhere in this article.
Targeted caregiver edit: October 21, 2026. Added the topic-specific handover questions and clarified narrative examples and planning limits. Earlier clinical sections retain their previous review scope; this update is not a full medical review.